Showing posts with label frugal tips. Show all posts

Monday, January 8, 2018

Money Making Apps: Shopkick


*Disclaimer: Links provided include my referral code. All opinions expressed are my own. 


One frugal tip I have for anyone with a smart phone is to find apps that help pay YOU to use them. The good thing about such apps, is that there are many that help you earn some money by scanning receipts, getting your steps in, or get rebates back on items you'd normally purchase.

An app I use often is called Shopkick. Using Shopkick while out and about is a great way to earn "kicks." These kicks are like points that can be redeemed for giftcards. I've fueled a few coffee runs using the kicks to get Starbucks gift cards. 


The best part about Shopkick is that you don't even have to buy anything to collect kicks. You can go to a store and get kicks for walking in, as well as scan items while shopping and earn more. You can see the kicks available under "walk-ins," "scans," and "receipts." There are times when you can submit any receipt and still get kicks as well!


If you happen to buy the items you scan you can earn even more kicks- but I don't buy things I don't want or need just to get them. You can also open the app when shopping online and earn kicks as well! 

If you want to start off with some points just for signing up, use code EARN466233 or just click this link to sign up.


Sunday, February 24, 2013

Fun Sundays: The Children's Museum


This week was wonderful for us. We got to spend Monday together as family, because the kids and I were off of school and my husband was able to take a personal day. Even though we have a lot of work going on right now, my husband really wanted to do something fun with the kids, he decided to do the Children's Museum, and when he checked to see what their hours were found out even better news: It was FREE.

This was one of the special Free days at our museum! That pretty much made the decision for us to go so much easier. I know not everyone would be happy at the thought of a free day (not because of the price, but because of the crowds), but I have a few tips on how to survive if you plan to brave it.

1. Go early. So the free day lasts from 10-4? Get there at 10. The closer to 10 the better. People arrive constantly throughout the day, getting there early ensures you'll be able to walk in and see a few things before it gets completely packed and you can't even maneuver around the crowds or keep track of your kids. Best bet is to arrive with a list of 3-4 things you want to see and plan the best way to work them in.

2. Don't bring a stroller. Just don't. Normally they are helpful with holding things you need and are a place to put the toddler at the end of the day. On free day they are constantly stuck in one place as people walk around you and cut you off from your family. There are fewer places to park the stroller so you have to choose to stay with it or leave it and wonder if you'll come back to it later. Honestly, you won't be there long enough to really need it.

3. Leave early. Yes, the museum is open until 4, but as you arrived at 10am the steady stream of people hasn't stopped. Lines begin to form, parents get grouchy, and your stroller is stuck. Just because you can stay, doesn't mean that you'll enjoy the time you have. This is why making sure to visit the few exhibits you really wanted to check out helps. You've done the stuff you came for, quit while you're ahead.

4. Eat before. Eat after. Don't plan to eat at the museum on the free day. Not only is the food not part of the free admission, but you're wasting time in a big crowd eating overpriced food while you could be going to a restaurant or having a picnic lunch somewhere else. If you eat before you get there, and plan to eat after you leave, it'll work out perfectly.

5. Have fun. You'll see kids crying (they may be your own). You'll see parents losing their cool (they may be you). You may not get to do everything you planned. You'll swear you will never come to a free day again. Then your kids will thank you and talk nonstop about all the fun they had that day. You'll know that not only were you able to do something fun, but that it was of little to no expense. And you'll do it again if you get the chance :)

Saturday, February 2, 2013

Save it Saturday: Save your Trash!

The saying "One man's trash is another man's treasure" isn't new at all. It's all about realizing that something's value is related to how useful someone can make something. If it isn't useful to you, it becomes trash, and leaves your home, but that doesn't mean that it doesn't have a use.

I just think that there are times when we are too quick to call something trash, rather than figure out a purpose for it. When we put out our trash each week (even with recycling- our area only collects specific things), so much goes wasted. So I've been working on trying to collect things (thankfully I have the basement space to do so) and turn them into something I can use.


  • I've used the tin cans for various things from Girl Scout Projects to organizing my workspace. I keep saving them because I know that I'll find another use for them, like these lanterns on Pinterest


  • We garden each year and I make pickles from the cucumbers. Only I can't keep them in the house because the kids eat them all. This year I plan to make refrigerator pickles so I've been keeping pickle jars to reuse for that, and I can save my canning jars for things I really need to preserve for a longer time. 


  • I've posted a tutorial for a diaper box. These boxes also make great moving boxes, and even if you don't make it over- they are great for storing things. 


  • I've found that the little Greek yogurt cups are the perfect portions for snacks, especially for the toddler. They also make great water dishes when the kids are painting.

  • I've made scarves from old shirts (some results were better than others ;) ). 


  • I keep ice cream tubs for a variety of reasons! They are good popcorn bowls, buckets for the park, or even for when sick kids need a bowl near them while sick (though after that they find their way in the recycling bin). 

Do you hang onto things? What kinds of trash have you made into treasure? 

Saturday, January 26, 2013

Save it Saturday: My Points

If you are a BzzAgent, you probably have a MyPoints account already. If not, I recommend signing up!

With BzzAgent you earn MyPoints when you take surveys, submit Bzz, and more, but it's something you can use even if you aren't a BzzAgent (though I recommend doing that too ;) ).


I get daily emails from MyPoints. It can be overwhelming if you don't check your email daily, but most have links to click to earn 5 points. I can earn 20+ points a day just from those emails with no other action needed. If you want to put more into it, you can take surveys, use their toolbar, and buy giftcards to earn points back.

I've earned a lifetime of 13,000 points which can translate to about $75 in Amazon giftcards just for clicking links in emails (and being a BzzAgent). It's not going to make you rich, but every little bit helps support our family of 5 (and things like this are great for splurging without hurting the budget).


Saturday, January 19, 2013

Save it Saturday: Aldi


One thing I mentioned in my Menu Monday post is that I do a lot of my shopping at Aldi.


Shopping at Aldi is a bit different than a typical grocery store:

  • They are smaller and most products are the Aldi brand. 
  • You use a quarter to get your cart, and bring it back to get it back. 
  • You bring your own bags (or buy at the counter)
  • You bag your own groceries
  • You can only pay with cash, debit and EBT cards.
These things are really not that much of an inconvenience (and you saw how much I bought!). I pack up my bags, make sure I have a quarter in my pocket, and I get to bag things in a way that makes sense to me rather than hope the bagger doesn't put my bread with the 2 liters.

If you are a stickler to brands or need to use coupons, you may not find it to be as great as I do. I don't have the time to shop sales and coupons (or, I don't want to make the time to do so), and I am not picky about brands. I've tried a variety of the Aldi products and have only had an issue once.

I bought a box of taco shells and every single one was broken. I emailed the company, made nachos rather than tacos, and called it a day. Because of The Double Guarantee, I was sent a replacement product and could have gotten my money back. They are so sure you'll like their products that they will replace it if not. 

A friend recently tried it and found she saved $100 just by shopping at Aldi. It isn't for everyone, and sometimes the deals are better than others, but it fits our lifestyle and has saved us money in the process :) 

Saturday, January 12, 2013

Save it Saturday: Amazon Student

If you're a student- Amazon Student is a really good investment!


I've used Amazon in the past as a student to buy textbooks, office supplies, and even random things for projects (Need astronaut ice cream? They have it!), and the 2-day shipping makes it really convenient because there are times things will come up and I need them pretty quickly.

By joining right now you'll get to try it for free for 6 months! Just think of how much you'll save in shipping :)


*Disclosure: Link is my referral link. Please read my disclosure policy if you have any questions.

Saturday, January 5, 2013

Save it Saturday- Endorse


One of the best ways to save money, is to earn it back on things you'd buy anyway. That's what Endorse does. It is an app that you download to your smartphone, and upload pictures of your receipts to after you're done shopping. New offers are available on Thursdays and you have 6 days from when you make a purchase to upload your receipt (though I do it the day of since it is just easier that way for me).

I was able to try Endorse as a BzzAgent, but have kept using it since the campaign ended. I haven't earned a lot back, but everything I have earned has been on products I was going to buy already- so to me it is worthwhile to use it. Every little bit I save (or earn back) helps! The link above is my referral link, if you refer people you earn $1 if they download the app, so once you've tried it you can refer friends and earn even more :)


Friday, December 28, 2012

Diaper Box: Revamped!


I can't claim to have thought of this idea. I've seen many all over Pinterest. There are a lot of options for a diaper box. You can glue paper all over it, paint it, glue fabric on it, sew liners, etc. Really if you look you'll probably find a way to revamp it to suit your needs.


That's what I did with this. I don't possess sewing skills outside a basic blanket stitch, so sewing was out.

I don't have a lot of fabric on hand (reason: I can't sew), so even gluing it all over a box was out.

The only wrapping paper I have on hand right now is Christmas, so that was out.

I did have leftover paint from when my husband painted my workspace, scrap fabric from recovering chairs years and years (and years) ago, a glue gun, and an idea.


Start with a diaper (or other) box. Cut the flaps off the top of the box (and out of the handle if your box has them).


Start painting. I painted all over the outside (even the bottom) of the box.


Since the box is glossy, you really need to let the coats dry to cover as much of the print as you can. So add a coat, go read for a bit, then come back and add another.


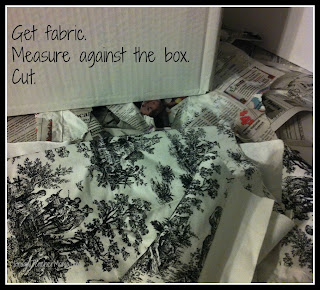
Once the box is dry, measure your fabric against it. I made mine about 3 inches wide and the length of the box (2 shorter, 2 longer).


Glue a hem for the fabric (reason: I can't sew). I glued a hem by gluing a little bit, folding the fabric over, then continuing. If you can sew, sewing a hem would work too.


I wanted it to stand out a bit more, even after adding the fabric. I cut these freehand (really? can't tell!) and glued them onto the box.


I decided to paint a label for the box I also did these freehand. I know. I thought so too.

Then you have some boxes re-purposed for your needs :) I plan to do at least one more for these shelves, or if my 2 year old's potty training goes the way it has been: for every shelf in the house. It's a long battle.

Sunday, November 25, 2012

Ways to make Christmas Awesome (without breaking the bank)

It's that time of year again. Where I start to base my self-worth on how many presents I'm able to put under the tree and start to feel the green envy monster come out when others are able to put better things under theirs.

It's such a frustrating time because I feel like parts of myself are at war with each other. The part that wants to spoil my children rotten pouts at the part of me that has to do the budget. Then the part of me who wonders why we put so much stock into all the extravagance comes out and complains that we're feeding greed and selfishness. The part of me who gets dazzled by all the lights and tradition of it all tells that part of me to get over myself.

My head is a scary place sometimes.

This year our financial constraints are even more difficult. I feel like I say that every year, so maybe it's really just me having to come to terms with the fact that I have champagne dreams on an apple juice budget (I'd say beer, but I think that may even be too pricey right now).


Somehow I got to gather all my different parts together and focus on the things we can do, and I wanted to share those with you. Every year we have a countdown to Christmas starting Dec 1. Here are some of the things that make the list every year:

1. Make a "countdown to Christmas" chain. One year we had so little that I ended up making the chain using white paper and red and green crayons. The kids scribbled on the paper and I cut it into strips to make the chain. It wasn't really spectacular but it didn't have to be.

2. Movie nights. We pop popcorn, light up the tree, put on our pjs, and watch a movie together as a family. This may not seem out of the ordinary, but it has always been special and being Christmas just adds to that.

3. Salt dough ornaments. You can find a variety of different recipes online. Some add cinnamon to make them more festive, some are colored with Kool-aid, and others are mixed with glitter. As the bare bones it is usually a cup of flour, a cup of salt, and water added gradually. Let dry overnight or  cook in a low oven. Even if they don't go with your tree decor or end up in pieces later (thank you toddler!), the memories you make by creating them will last far longer.


4. Make Christmas cards. We keep a bunch from previous years, and use those to make cards for others. This is the time when the thought is more important than the end result, but the kids love putting their hearts into something for others.

5. Check your library. Our library has has programs where children can make a Christmas craft, listen to a story, meet reindeer, and bring in an ornament for their tree. These are all little things but can make some great memories.

6. Make Reindeer food. My daughter brought some home from preschool one year, but I worried about putting glitter out on the ground. So when we make our own I use food coloring to color oats green, then add some red coloring to sugar. Mix it together and you have reindeer food ready to put out on Christmas Eve!


7. Go see the lights. We have bundled the kids up in their PJs with cups of hot (warm) cocoa and driven around the neighborhood to see the lights. I love watching through their eyes, because even the houses with one strand of lights get an "ohhh!!!" out of them :)

8. Sing Christmas Carols. Visit your friends and family and sing a carol for them. Skype with out of town relatives and sing for them. Record your kids singing and put it on facebook. Mine love to watch themselves, so giving them a chance to "perform" has always been a hit.

9. Make cookies. There are so many great cookie recipes (and thanks to pinterest my list of ones to try has tripled), and some only take a few ingredients. Find ones that match what you already have so that you're not buying pricey ingredients that you'll only use once. Food coloring and powdered sugar go a long way :)

10. Visit Santa. The mall Santa may be pricey, but if you watch you may be able to find a way to visit Santa locally for free. Our park has Santa on the weekends and even gives free cocoa and cookies. We take our own picture and the kids have a lot of fun without us spending anything extra.


What are your frugal Christmas Traditions? I'm make my list this year and I'd love some inspiration to add to it :)

Monday, October 29, 2012

5 Frugal Last Minute Halloween Costumes


It's that time of year again. The time when I think about how I planned to put together the perfect Halloween Costumes for my kids but then ran out of time and money and now we have costume parties to attend and I have even less time to think than I did at the beginning of the month where the past-me decided I had plenty of time.

She always does this to me.

Anyway. I have a few tips for putting together a quick costume. None of these are fancy, amazing, or award-winning, but at the least they'll get your kids (or yourself) ready for a party without adding to your headache (I hope!).

1. Raid the Dress Up Boxes. If your house is like mine, you have dress up boxes with previous costumes, old clothes, or other treasures to raid. This is the part where incomplete costumes can be even better. Throw on a mismatch of clothes and be a clown, a silly princess, or a super hero.

2. Hit the books (not literally!). Pick a favorite character from a book and dress like them. My daughter wants to be Junie B. Jones's First Boxed Set Ever! (Books 1-4)  this year, and with some striped tights, a skirt, a bow in her hair and a sweater, she'll be able to pull off the look easily. Harold and the Purple Crayon is another easy one, Harold and the Purple Crayon Board Book, use a wrapping paper tube covered in construction paper! Another is the Paperbag Princess, The Paper Bag Princess (Classic Munsch), you just need to brown bag it at the grocery store and score an instant costume!

3. Makeover time! Break into your makeup collection (or buy an inexpensive kit to use) and use makeup to make the costume. Kids can be anything from a vampire to a zombie in their own clothing (no costumes to buy!).

4. Box it up! Use a diaper box or other large box as your costume base. You can wrap it and be a present, television, washing machine, or robot. Then just dress in one color and let the box sell the look.

5. Mismatch. When you're down to the wire and have no time for anything else, just go mismatched! Put your clothing on backward, blend your stripes with plaid and polka dots and put on two different socks. Complete the look with crazy hair and you've got an easy, frugal costume!

Wednesday, June 8, 2011

Strawberries!

I got to go to a local orchard and pick strawberries today! They were $1.50 a pound and so yummy. In my area, that price is better than most grocery sales plus we got to make it a family day. The kids had so much fun picking berries and I love to do anything that reminds them of where their food comes from.


We picked 10lbs of berries and spent $15. I let the kids eat until they were stuffed, then I set to wrk on the rest.


I work on an assembly line when I do any bulk cooking or freezing. It is organized and efficient. I washed the berries, cut the tops off, then cut them up. The best berries went in a bowl in the fridge. The rest were put on cookie sheets and put in the freezer. Once frozen, they are transferred to a freezer bag. They make wonderful smoothies and are cheaper than store bought!

Don't toss the tops of those berries! Wash them really well, then put them on the stove with a 2 to 1 ratio of sugar and water. For this batch I put 4 cups of water and 2 cups of sugar.


Bring to a boil, then cook until the berries start to lose color. Strain the berries out and return the liquid to the stove. Reduce it as uch as desired.


Cool and store in the fridge.


Even though the "sauce": was thin, it made for an amazing ice cream topping. Add it to carbonated water for a fruity soda or add some to regular cola to make it strawberry.


It's got fruit, so this is healthfood, right?

Sunday, May 15, 2011

How to Menu Plan: Inventory Version.


So you already went shopping for groceries and now you want to know what to do with them. Rather than just figure it out as you go (and risk having to run to the store for a missing ingredient or 5), use your inventory to your advantage.

Some may say that it saves more money to make the menu before you go shopping, but all is not lost if you do it in the reverse order. Sometimes the sales aren’t very clear, sometimes you find a great deal on Manager’s Special, and other times you just have to use up the pantry to save a bit more this week. You can still make a Menu and have it save you both time and money. I would even argue that planning after the fact can be more cost-effective if you are the type that will keep a stocked pantry and freezer.

First step is to take an inventory of what you have. If you are a meat-eater and plan your menu around the meat you buy, make a list of what you have in your freezer available to make meals out of. Then check the cupboards for what you have to add to the meat to make well-rounded meals. Though I like to use paper and pencil to write out my inventory, you could also do this on the computer. The benefit to using your own Excel document is that you can get it all out once, then print it off and use that list to mark what you have rather than write it out each week. It can also become a pantry shopping list and if you want to get really detailed you can even add in the price of each item.

Start by listing the meals you have all the ingredients to make. Cross off the meats and other ingredients as you plan to use them to make those meals. This helps prevent “double booking” your food. Once you have figured out the meals you can make without a variation or substitution, start on the next step.

Plan your substitutions. If you see that you have chicken, soy sauce, rice, but no stir-fry veggies, don’t rule out making a stir-fry. See if you have frozen broccoli or leftover veggies from other meals. It may make a different meal than you’re used to, but it will still taste good and fill your family up. Another meal that does well with substitutions is soup.  You can add leftover rice, veggies, and meat with some broth and make another meal. You also don’t have to have every single ingredient on a recipe card, since it is more of a process than a recipe. 

Still need more meal ideas? Allrecipes.com has an Ingredient Search where you can list what you have on hand (and even some things you want to avoid) and get suggestions.

Write it out. Now that you have made the list of what you can make with what you have on hand, write it out! Sometimes we get busy after planning and then when dinner time comes around we can’t remember everything we planned on making. Writing it down can help prevent this. It can also help avoid making the same meals all the time. You have a list of the stuff you have recently made, and can choose different meals the next time you plan.

I choose to stop there. I have a list of 14 meals to cook for the next 14 days and pick the meal based on what I am able to make on any given day. I like the leeway this allows, since something can come up on a day I planned to make a more time consuming meal and I can just pick one of the quick meals I have on the list and still know that everything is on hand to make it. If you would rather plan your menu to the day, you can go ahead and do that. I tend to pencil in the crock pot meals on days I know I’ll be out of the house a lot, so that I don’t have to worry about coming home and cooking. Also if you plan to go out to eat, eat at a friend’s, or have family over to eat- make sure to add that to your menu as well!

So, now that I've listed my menu-planning process, I am off to make my menu for the next 2 weeks. I'll be posting it tomorrow with a chance for you to link up your Menus as well, so get planning! 

Wednesday, May 11, 2011

Beauty School Drop Out

I feel like watching Grease :)

Today I got to have a wonderful "Girl's Day Out" with a great group of friends. It was even more special because one of my dear friends is pregnant and due this month and this was a way for us to pamper her with both Pampering and Pampers (It was a diaper shower). I talked about making a Diaper Cake before and that is exactly what another friend and I did for her shower. It turned out really well and since the diapers are size 2, she'll get to display it for a little while before putting the diapers to good use.

We met at a Beauty School in town to do the pampering. Check in your area if you have one available! The one we went to was very reasonably priced and it made a day of pampering affordable. I was able to get a facial for only $4 (plus tip) which is practically unheard of. They also offer manicures, pedicures, scalp treatments, updos, waxing, and more at severely discounted rates. They are students, so you may be there a little longer since some are new to it, and you may not get the quality you would at an expensive salon but you still get to get out and feel pampered.

I know that I will be back. Between that and the coffee shop a few doors down I felt completely pampered today and I'm not even the Mom-to-be! I also got to support local businesses and save money at the same time. :)

Wednesday, May 4, 2011

Frugal Gift Idea: Diaper Cakes

Packages of diapers come in handy. Getting them in advance helps a lot because you can avoid the unexpected trips to the store when your baby outgrows a size suddenly. I know this really helped for me, since my son was barely in Newborns and then flew through Size 1s. Having the next size up on hand helped me diaper frugally because I didn't have to pay retail, I shopped sales and bought when they were a good bargain throughout my pregnancy.

Buying a pack of diapers would be so appreciated at most baby showers, many showers are just "diaper showers" especially for second or more children. Getting diapers that are not the Newborn sizes would probably be even more appreciated because they help start a stockpile for the parents to be. Just the diapers are present enough, but if you want to do it a little differently, you can make a Diaper Cake.


The first step when making a diaper cake is to decide what size diapers. My friend and I have made many for the mothers in our group and have found that 2-3s work best. You can make a good sized cake out of a Jumbo package of diapers. Plus the new mom won't have to take it apart right away to use it.

What you'll need:
1 Jumbo package of diapers (size 2 or 3)
4-5 cloth diapers (the thin ones that are used for burp cloths are perfect)
1 large package of rubber bands
Hot glue gun
Pins
Dowl rods (to help provide support)
Ribbon + decorative items

First your wrap the diapers up by rolling it from the open end to the bottom and secure it with a rubber band. Do this with all the diapers.

Then gather the diapers together to make the cake layers. The top layer will have fewer than the middle and bottom layers. Start with about 7 diapers for the top, put a large rubber band around all 7 binding them together, then add more as needed. Start with 7 for the middle and add more around, then do the same for the bottom layer. Depending on the size of the diapers and the brand you could need fewer or more diapers to make it look right.

Then wrap the outside of the layers with a cloth diaper folded in 4ths. Pin this to the diapers (that will be the back of the cake). The bigger layers may need more than one diaper. *Please be sure to let the mother know there are pins!* This step can be skipped, but it makes it look better.

Hot glue ribbon around the layers and decorate as desired. You could also add baby care items to the cake. This is really just a basic guide and you can make it as big as you want to. You can make it part of the baby shower theme, match the nursery decor, etc.

Insert the dowel rods and plan to have a base for the cake to make it easier to transport. Usually tissue paper covering a piece of cardboard works well.


The end result is a beautiful diaper cakes that is both fun and functional.

Wednesday, March 30, 2011

The Best things in Life are Free

One aspect of frugality that can be the most difficult is the feeling that you're constantly denying yourself the things you want. Spending money can be more fun than saving it, but there are ways that we have fun and make our families happy without breaking the bank.

The simple things in life make me happy. I love sleeping in a few extra minutes, getting to enjoy a cup of coffee in the morning, lazy Sundays where the kids wake to their own internal clocks, and the chance to spend time outside in the dirt. I think my kids would agree with that last one. They love to ride their bikes, create pictures out of paper, crayons, and glue, and play with the dog.

We are blessed in that we get to do many things as a a family, but some of the things that make us the happiest are ones that we take for granted. We have at-home movie nights as a family which really can be more fun than going to a theater because we can enjoy the movie without worrying about making too much noise. We are happy to just relax in the comfort of our own home and spend time together.

Gardening is another thing that makes my family happy. We enjoy the food it provides, but it is also a hobby that we can all enjoy together. The kids helped my husband plant the starts a few weeks ago and a few days ago they were so excited to report that some had sprouted. When the plants are in the ground outside they are my biggest helpers and love to water the garden, pick the produce, and eat what they pick. It helps save money, but it is also a fun and happy experience for my family.

Reading is another frugal activity that makes my family happy. I love a good book and my kids aren't able to go to bed until they have heard a bedtime story, or 4. We keep this frugal by going to the library often. The library is such a great resource in our area. They have a weekly story time for my son, but also have many reading programs for kids of all ages. We participated in their summer reading program and my kids were so happy to get to read so many books and earn prizes. Each week they would get to learn about something new, I think my son was the happiest when Firemen came to speak and he got to sit in the truck.

How do you make your family happy without breaking the bank? Are the best things in life really free?

“I wrote this blog post while participating in the SocialMoms and Farm Rich blogging program, for a gift card worth $25. For more information on how you can participate, click here.”

Monday, March 21, 2011

Cooking With Dried Beans

I tried to switch to a mostly vegetarian diet a year ago, but once I got pregnant the meat cravings won. I started using beans in my recipes as meat replacements, and still enjoy using them now. Beans are a lot cheaper than meat, and using dried beans can save even more money.

There are a few ways to prepare dried beans. You could just cook them in the dish you're making (which can be time consuming) or prepare them in advance. There are also a couple ways to cook them in advance, you could do an overnight soak then cook all day in a crockpot or do a rapid soak and simmer them on the stove. I usually choose the crock pot route, but my big one broke and the small one doesn't hold enough. So I will show you the stove top method today.

Start by rinsing your beans. I like to mix red and black beans. They add a hearty flavor in chili, rice dishes, and soups. This will make a lot of beans (they get bigger as they cook), but that's the point. I like the cook once, use many times method. I can have these ready to go so they are as convenient as canned but less expensive.


Add them to a pot of cold water (pick out any skins or bad looking beans)


Bring to a rolling boil and let them boil for 10 minutes.


Remove from heat, cover and let it sit for at least an hour.


Drain the beans. You can see how they have grown in size! The red beans tend to look a bit dingy when cooked with black beans, but they still taste good.


Add the beans to a pot of hot water. I like to put a generous spoonful of garlic at this point.


Bring to a boil. Cover partly with the lid, reduce heat and let it simmer for 2 1/2 hours. This is a good thing to do on a cleaning day since you don't really have to babysit it. Just set a timer for each step and move onto other jobs.


Drain the beans and set up your workstation. I labeled quart-sized freezer bags and got a measuring cup out.


I scoop out about 2 cups per bag. I use one bag per meal.


I roll them to get the air out.


Then lay flat to store.


I wound up with 6 bags (12 cups) of beans. This will make at least 6 meals (more if I reuse leftovers). The beans were a little over $2, so this was a little over 30 cents per meal and just as easy as using a can. When I used them, I can either pull them out of the freezer and let them defrost in the fridge or just add them directly to what I'm making.

Using dried beans has just become a regular routine for me. When I start to get low, I make another batch. I like having them on hand to make quick meals. 

Sunday, March 20, 2011

Spring Cleaning! + Kids Clothing Tips

With 70* days it feels like Spring is really starting on time! Though in Indiana the weather can change in five minutes, but I am hoping it is here to stay.

The kids have Spring Break this week and since it is going to be rainy one, I want to get organization and cleaning done (my poor kids).


I was ready to change over the wardrobes this weekend. I buy my kids' clothing in advance from friends, yard sales, or even the yard sale leftovers that friends just want out of their house. I keep a tote for my daughter and one for my son and keep off season or too big clothing in each. I have about 3 totes for my baby, and am thankful that I bought and kept so much in advance since he is wearing 9 month clothing at 6 months right now. For his clothing, I sort by size so when one size is too small I can just pull out the next tote and rotate. I have been blessed with many generous friends and many amazing deals on clothing.

We went through all the drawers and pulled out clothes that were too small or too warm. Then I had them try on the clothing kept from last year to see if anything could be used again this year. Once I sorted it all out, I put the too small stuff in one box, and put the too big/too warm stuff in the respective totes.


I finished up the cleaning by doing 6 loads of laundry. I washed all the stuff we pulled out for spring (this helps because as I get new clothing I just store it and know to wash everything when I pull it out rather than have to wash it twice), and put away more winter items that were in the dirty laundry when we went through the clothing. I have a good amount of 4T stuff to put up for my youngest to use later, a bag of 6 girls clothing to pass onto friends, and the rest of the winter stuff packed away and ready for next year.

Throughout the year I will buy clothing on clearance, if it is cheap enough or for special occasions. I have my daughter's Christmas dress for next year hanging in her closet from the after Christmas clearance. I also stretch these dresses to last 2 years if possible. I also watch Garage Sales and buy inexpensive clothing. If a friend offers to give a trash bag of clothing, I always accept. I pull out what I know we can use and then donate the rest or pass it on to another friend for their turn to go through it. I try not to keep things more than 2 sizes too big though, just to conserve storage space.


My system works well for me. I don't always know exactly what I have, but I have a general idea and know that if my kids have a sudden growth spurt that I should be able to clothe them without having to spend a lot on a new wardrobe. It also saves space in drawers and the closet to be able to store off-season clothing separate.

What is your system for seasonal clothing? Do you buy in advance?
Web Statistics